A battery vent tube is a small rubber hose that runs from the battery’s vent outlet to the outside of the car. It lets any hydrogen or acid vapor the battery produces escape safely from the vehicle. Modern Audi batteries (especially those stored in the trunk) often use these tubes. As the battery charges, it breaks water into hydrogen and oxygen gas. These gasses are flammable and must be released through a vent so pressure doesn’t build up. Simply put, the vent tube keeps dangerous gas out of the car and protects surrounding parts. If you look at an Audi battery setup, you’ll see a short hose attached to the battery’s side vent and routed to a hole or plug on the car body.
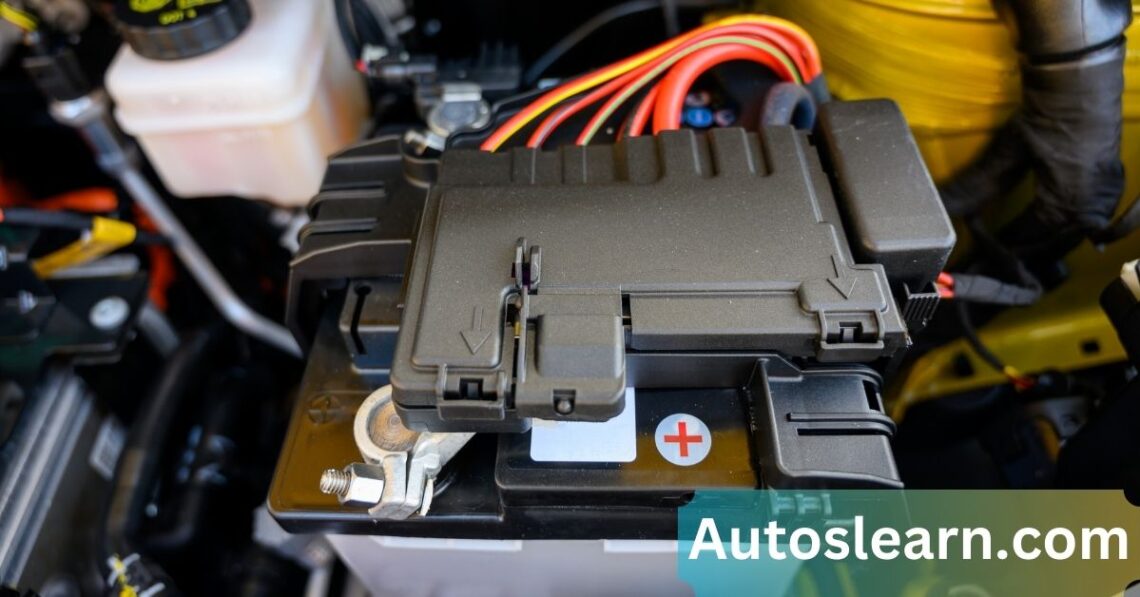
Illustration: Example of an Audi battery vent tube (the flexible hose that connects the battery’s vent port to an outlet on the car body). The tube above resembles an OEM Audi part, with a small bent segment that fits over the battery vent outlet. Not all models will use the same shape, but the function is the same: carry vented gas from the battery out of the vehicle.
You might need to remove the vent tube for several reasons. The most common is battery replacement or maintenance. When the old battery is removed, its vent tube must be detached. You might also remove the tube to clean or inspect it. For example, spilled battery acid or salt buildup can clog the hose, so you might take it off to rinse or replace it. Another reason is if you suspect the tube or its connections are damaged or cracked, you’ll remove and replace it. In some cases, owners swap an OEM battery for an aftermarket one that doesn’t use a vent tube; then, the old tube might be removed or capped off.
When and Why to Remove the Audi Vent Tube:
1. Battery replacement:
If you’re changing the battery (for example, installing a new or AGM-style battery), disconnect and remove the vent tube first. The tube is usually attached to the old battery’s vent; it won’t slide off without detaching it.
2. Cleaning and inspection:
After an acid spill or if the battery area is dirty, removing the tube lets you clean the battery compartment and flush out any residue. It’s also a chance to check that the tube and vent port aren’t blocked.
3. Repair or replacement:
If the tube has hardened, cracked, or kinked, remove it to fit a new tube. Similarly, if the vent connection on the battery or car body is broken, you must remove it to replace that part.
4. Model or battery changes:
Some Audis originally came with vented batteries, but you may switch to a sealed (AGM) battery. In that case, remove the old vent tube or keep it as a precaution. Conversely, if an OEM tube was missing, you might add one of the new battery vents.
In short, remove the vent tube whenever you need clear access to the battery or vent system. If the battery still needs venting, always plan to reinstall it or cap any open vent outlet.
Tools Required to Replace an Audi OEM Battery Safely:

Gather these tools and safety items before you begin:
1. Wrench or socket set (8–10mm):
For loosening the battery terminal nuts and any hold-down bolts. Audi battery terminals often use small metric sizes. A ratchet set or a fixed wrench will disconnect the cables from the battery posts.
2. Torx screwdriver (T20 or T25):
Many Audis use Torx screws on panels and parts. In particular, the battery vent port cover on the car body is often held by Torx screws. Check which Torx bit fits.
3. Allen (hex) keys:
Some trunk or side panels use Allen head bolts to hold the battery cover or trim pieces. Have a small set (e.g., 3–5mm) ready.
4. Flathead/Phillips screwdriver:
This tool is useful for prying up covers or clips and gently prying off plastic clips or connectors if needed.
5. Pliers or cutter (optional):
A pair of pliers or wire cutters can help remove a tight hose clamp or a metal clip that secures the vent tube.
6. Insulating tape or clamp:
If you plan to reuse the tube, you may need a new clamp or tape to reseal it after reinstalling. (It is not always needed, but carry some electrical tape.)
7. Gloves and safety glasses:
Always wear rubber or nitrile gloves and eye protection. Battery acid can burn skin; even a maintenance-free battery can leak acid spray. A caption in the sources warns that hydrogen and oxygen gasses are flammable. Do not work near flames or sparks; remove any metal jewelry to avoid short circuits. Treat the battery area as hazardous by wearing gear.
8. Tray or small box:
Use a container to hold screws, clips, or small parts you remove so they don’t get lost.
9. Rags or paper towels:
To clean any residue and protect surfaces.
Having the right tools makes the job smoother and safer. For example, as shown in related Audi DIY guides, always disconnect the negative cable first (black terminal) to reduce risk.
Battery and Vent Tube Removal Steps for Audi Vehicles:
1. Prepare the car for safety:
Park on level ground, turn off the engine and engage the parking brake. Remove the car key from the ignition. Open the trunk or hood to access the battery. (Most Audis, like the A4, A6, or Q5, have the 12V battery in the rear trunk area, often under a side panel on the left.) Wear your gloves and safety glasses.
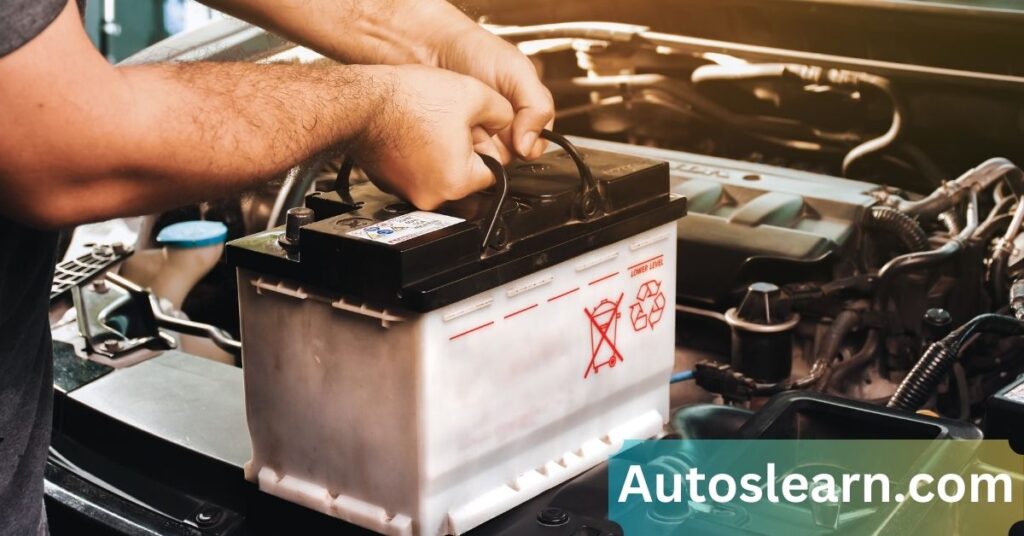
2. Disconnect the battery cables:
Use a wrench or socket to loosen the nut on the negative (–) terminal, which is typically marked with a “–” symbol or is black. Carefully lift the negative cable off the battery post and move it aside to prevent accidental contact. Next, loosen and remove the positive (+) terminal, usually identified by a red cable. This order—negative first—is crucial for safety. Once both wires are off, the car won’t have electrical power (so the engine won’t start, and you avoid sparks). Wipe the terminal posts clean with a rag if they look corroded, as you might as well clean them now.
3. Remove any covers or panels:
In many Audis, the battery is under a trim panel or carpet in the trunk. Use your Torx or Allen keys to remove screws or clips holding down the panel. Carefully pull up the panel to expose the top of the battery. Also, remove the battery hold-down clamp or bracket (often a bolt or wing nut) if present. This bracket keeps the battery from moving. Set screws and covers aside in your tray.
4. Locate the vent tube and vent port:
The OEM vent tube is a short rubber or plastic hose attached to the side of the battery. Follow the hose toward the car body. You will find the other end of the tube attached to a small port (often in the trunk side panel or floor), which is secured by screws or a clip. Could you take note of how it is routed? If your battery has two vent holes (some do), the tube usually goes on one side only, and the other may be covered or capped.
5. Detach the vent tube from the body port:
Use the Torx driver to remove the screws holding the vent port housing to the car. On many Audi models, these are Torx T20 or T25 screws. Keep the screws in your tray. Once unscrewed, the port assembly (a little plastic funnel) will pull out of the panel. Gently pull the end of the vent hose free from the port opening. It may be clipped in, so you might feel or see a small plastic clip – gently compress it with pliers or hands to slide the hose out.
6. Detach the tube from the battery:
Now, pull the other end of the tube off the battery’s vent outlet. This outlet may look like a small round spigot or a nipple on the battery case. Wiggle the hose while pulling; sometimes, it’s tight. If a metal clamp or clip is on the battery vent, carefully undo it with pliers or screwdriver. Be gentle so you don’t tear the hose. Once the hose is loose, pull it away from the battery.
7. Inspect and clean as needed:
Look at the battery vent outlet and the tube interior with the tube off. Check the hose for cracks, stiffness, or clogging. Shine a flashlight down the tube to see if it’s clear. If it’s blocked, blow air through it or replace it. Clean the battery vent outlet and surrounding area with a damp rag (wear gloves — battery acid residue can corrode metal). Also, check the car’s vent port opening for any debris or signs of water entry. If the gasket or port is damaged, clean or plan to replace it.
8. Handle the removed tube:
If you are inspecting, reconnect the same tube later. If you’re replacing it, you now have the old tube free. Ensure the replacement is the correct length and shape for your Audi model. If reusing the tube, push it back securely into the battery’s vent outlet when reinstalling. You might wrap some tape around it to ensure a tight seal.
9. Reconnect or install vent tube (reverse process):
When you’re ready to put everything back, firmly attach one end of the tube to the battery’s vent port. If it has a raised ridge or clip, seat it fully. Then, place the vent port cover (with any gasket) back in the car panel and slide the other end of the tube into the port funnel. Fasten the screws to secure the port housing in place. Make sure the tube isn’t kinked or pinched. All connections should be snug so the hose seals and no gas leaks into the trunk interior.
10. Reinstall the battery and cables:
If you removed it, put it back in its tray and tighten the hold-down bracket again. Reconnect the positive (+) cable first, then the negative (–) cable last (reverse of removal). Tighten the terminal nuts with your wrench. This order keeps the negative grounded last and avoids sparks. Double-check that all nuts and screws are secure.
11. Final check:
Close up any panels or covers you removed. Start the car and let it run for a minute. This is a good time to make sure everything is working normally. Listen for any strange hissing (not expected) and inspect around the battery for any unusual smells. If you smell a strong battery odor or see corrosion, power down and recheck your work. In a typical operation, you should see nothing happening, which means the vent tube is quietly venting hydrogen outside with no evidence in the cabin.
Each of these steps should be done carefully and methodically. Take your time, especially during disconnection and reconnection, because battery safety is paramount. Remember that hydrogen is flammable, so avoid generating sparks and always work in a ventilated space.
Battery Type and Venting Differences:
1. Flooded (wet) lead-acid batteries:
These are traditional batteries with removable caps over each cell. When charging or if overfilled, they generate hydrogen and oxygen gas. These need venting. Audi provides a vent tube to take the gas outside if placed in a trunk or enclosed space.
2. AGM/VRLA (absorbed glass mat) batteries:
Modern AGM batteries are often called “sealed” or “maintenance-free.” They have an internal pressure relief valve and contain their electrolyte in glass mats. AGM types typically do not require an external vent hose, unlike flooded batteries. The valve inside opens only if pressure builds up, releasing small amounts of gas. AGM batteries emit much less hydrogen than flooded batteries, and what they emit is mixed with oxygen. Many AGM batteries, instead of OEM ones, do not come with a vent tube. If you install a sealed AGM battery in an Audi that initially had a vent tube, you can often leave the tube off (or cap the battery’s vent port). However, it’s wise to check the battery’s documentation. If it has a visible vent port or cap, you may seal that port (the battery might include a small plug) or reattach the old tube just in case.
3. Lithium (12V) batteries:
Some electric/hybrid Audis use a small lithium 12V battery, but these are rare. Lithium batteries do not vent hydrogen gas as lead-acid ones, so they generally do not use a vent tube. They are sealed units. If you replace an Audi’s 12V battery with a lithium type, no vent tube is needed.
In summary, if your battery has a vent outlet and your car originally had a vent tube, use it. If the battery is truly sealed (no vent opening), you can usually skip utilizing a tube. Never plug the battery’s vent if it still needs to breathe — instead, attach the tube or leave the port open to the outside per manufacturer instructions. AGM batteries did not originally come with separate vent hoses on many Audi models, but if you reuse an older tube for extra safety in an enclosed space, it won’t hurt.
Battery Vent Tube Inspection and Installation Tips for Audi Vehicles:
While the vent tube is off, check carefully for any damage or wear:
1. Tube condition:
Inspect the hose from end to end. It needs to remain pliable—avoid any that feel brittle or show signs of cracking, especially since rubber can deteriorate with age and cold exposure. Watch for deep cuts or punctures, and ensure the interior is clear. If the hose is collapsed or blocked, it’s time for a replacement.
2. Connections:
The hose’s ends should fit snugly on the battery vent and into the car’s vent port. Inspect the clamps or clips. If your tube uses a metal clamp, ensure it isn’t rusted or broken. A loose clamp could let gas leak into the trunk.
3. Battery vent:
On the battery’s side, the vent outlet may have a little plastic nipple or screw cap. Make sure this is intact and not clogged with dirt. If there was a plug and you removed it, don’t lose it. If it’s broken, battery gasses could escape uncontrolled.
4. Car body port:
The hole or grommet in the car panel where the tube exits should be in good shape. Some Audis have a rubber bung on the underside to seal unused holes. If the vent port housing (plastic funnel) is cracked or its gasket is damaged, replace it. Check that the screws hold the port flush; otherwise, water or fumes could get inside.
5. Signs of corrosion:
On or near the vent tube, look for white powder or greenish corrosion, which indicates acid. If you see this, it means the battery may have been leaking. Use a solution of baking soda to clean the area, rinse thoroughly with water, and dry it completely. Remember to wear gloves during the process for protection.
6. Routing:
Ensure the tube wasn’t rubbing against anything sharp or hot under the car. After reassembly, the hose should have a clear, gentle path without tight bends. A sharp kink can trap acid or restrict flow. Re-route as needed.
A well-installed vent tube will stay in place (sometimes Audi uses a metal clip to hold it on the battery) and point downward so any drips run out. After reinstalling, it should look similar to the factory.
If you find no vent tube on your Audi, here’s what that means: If your Audi model came from the factory with a sealed battery (no vent), you won’t see one. In that case, there’s nothing to remove or install. If your model has one, but it’s missing (maybe the previous owner left it off), consider adding it back. The vent outlet on the battery can be plugged in, but only if it genuinely doesn’t need it. Plugging a vented battery without providing an alternate path for gas is dangerous. If in doubt, consult the vehicle’s service manual or an Audi dealer for your model’s spec. Some cars (especially those with batteries under the hood or in well-ventilated spaces) use an open vent cap and no external hose. In that case, make sure the vent cap on the battery is present and not blocked.
Frequently Asked Questions:
Q1. Do I always need the vent tube if I use an AGM battery?
Not necessarily. Most AGM (sealed lead-acid) batteries have an internal relief valve and rarely expel gas during everyday use. Many people install AGM batteries in Audis without reattaching the old vent tube. However, if the original battery had a tube, you could leave it connected for extra safety; it won’t hurt. Always follow the battery maker’s guidelines: if the battery has a removable vent plug, plug it in or use the tube as recommended.
Q2. My Audi’s battery is in the trunk, but I don’t see a vent tube. Why?
Some Audi models do not use a tube, even with a trunk battery. They might have a sealed AGM battery or a covered vent directly from the trunk space. If there’s a sealed plug on the battery, it’s normal. Only if your previous battery had a hose and the new one doesn’t should you worry. Check your owner’s manual to see if your model calls for a vent tube. If it does and one is missing, consider getting an OEM tube so the battery gases can escape outside the vehicle.
Q3. Where does the vent tube exit on the car?
Usually in the rear cargo area. For example, on many Audis, the tube runs to a small hole or fitting on the left side of the trunk (behind the wheel well), and some exit underneath the car. The tube end may be hidden behind the trim. After removal, you’ll see where it was attached. When reinstalling it, ensure it points toward the outside, not under carpets.
Q4. What if the vent tube is clogged or blocked?
A clogged tube can trap explosive gas. If you suspect blockage (for example, if you smell gas in the trunk or see corrosion around the battery), remove the tube and blow through it or use a small brush to clear it. Replace it if it won’t come clean. When reinstalling, ensure the hose is completely clear inside.
Q5. Can I drive immediately after removing or reinstalling the vent tube?
Only after everything is reinstalled correctly. Once the tube is back on and the battery is connected, start the car. Let it idle for a few minutes. Check that there are no warning lights and that the electrical systems usually work. Look in the trunk to be sure you see no unusual steam or smell any strong fumes. If all seems normal, it’s fine to drive.
Q6. I see liquid or moisture in the vent tube area. Is that bad?
It’s not uncommon for some condensation or acid residue to collect near a vent, but it shouldn’t be much. Excess liquid might mean the battery was overfilled or leaked. If you find liquid, clean it up and see if it happens again. Ensure the tube isn’t siphoning water into the battery area (it shouldn’t run uphill). After reinstallation, run the car and check the hose end outside; any drips should fall out, not travel back in.
Q7. How do I know if the vent tube was originally installed correctly?
A correct installation has the hose firmly on both ends, sloping downward toward the exit, and secured so it can’t move or touch hot components. All screws or clips should be in place. If you’re unsure, compare with Audi diagrams or photos online for your model. In general, it should look neat and sealed.
Q8. My Audi doesn’t have an obvious vent tube but has a small black plug on the battery. What is that?
That plug covers the battery’s vent opening. On sealed batteries, it’s normal. If you remove that plug (for example, to attach a tube), replace it if you don’t reattach it. The plug prevents dirt or water from entering. If you attach a tube to that port, remove the plug and ensure the tube end fits tightly over the port before securing it.
Conclusion:
Handling the battery vent tube correctly is a small but essential part of safe battery maintenance. A vent tube may look like just a little hose, but it keeps hydrogen and oxygen from building up in your car – gasses that are both flammable. By carefully disconnecting it (with the battery off), inspecting it for damage, and then reconnecting or replacing it properly, you ensure that your Audi stays safe and the battery lives its best life. Always take precautions (disconnect the negative terminal first, wear gloves and glasses, and avoid sparks) whenever working with batteries. With the tube out of the way, you can change the battery, clean around the tray, and check fittings without leaks. Finally, when everything is reassembled, turn on the car and let it run a bit – a quick test to verify there are no hidden problems.